
Introduction
During this article I will be documenting the approach I took to set up a custom domain in AWS SAM.
For those that don’t know, the AWS Serverless Application Model (SAM) is a framework for building serverless applications. Essentially it is Amazon’s answer to the Serverless Framework.
Prerequisites
For the sake of brevity, I will assume that you have ran sam init, selected the hello world application and now have a structure similar to this:
├── README.md
├── events
│   └── event.json
├── hello_world
│   ├── app.py
│   └── requirements.txt
├── samconfig.toml
├── template.yaml
└── tests
I will also assume that you already have a hosted zone created within Route53.
Add parameters
The first thing to note is that we can use CloudFormation within the template.yaml file. So immediately we can drop our serverless hat, and put on our IaC one instead.
First, let’s add parameters to our template.yaml file:
Parameters:
  FQDN:
    Type: String
    Description: Fully qualified domain name, for example ip.rhuaridh.co.uk
  ZoneId:
    Type: String
    Description: Route53 Zone ID
These are the variables that are going to drive the creation of our domain and certificate.
Update resources
In the default template we will already have Resources defined, but let’s replace the Resources and the HelloWorldFunction nested section with the following:
Resources:

  # Create our SSL certificate
  GenerateCertificate:
    Type: AWS::CertificateManager::Certificate
    Properties:
      DomainName: !Ref FQDN
      ValidationMethod: DNS
      DomainValidationOptions:
      - DomainName: !Ref FQDN
        HostedZoneId: !Ref ZoneId

  # Create endpoint for our domain
  RestApiGateway:
    Type: AWS::Serverless::Api
    Properties:
      StageName: Prod
      Domain:
        DomainName: !Ref FQDN
        CertificateArn: !Ref GenerateCertificate
        Route53:
          HostedZoneId: !Ref ZoneId

  # This section should already exist, the important thing to add here is the new RestApiId
  HelloWorldFunction:
    Type: AWS::Serverless::Function
    Properties:
      CodeUri: hello_world/
      Handler: app.lambda_handler
      Runtime: python3.9
      Architectures:
        - x86_64
      Events:
        HelloWorld:
          Type: Api
          Properties:
            # !! Add this line:
            RestApiId: !Ref RestApiGateway # Add the RestApiId property
            Path: /hello
            Method: get
As you can see, we have added two new resources and adjusted the properties of our existing HelloWorld properties.
Adjust outputs
Let’s update our output to list our custom domain:
  HelloWorldApi:
    Description: "API Gateway endpoint URL for Prod stage for Hello World function"
    Value: !Sub "https://${FQDN}"
While it’s not essential, it is always nice to have the domain listed for us in the output.
Find our custom parameters
Next, let’s find those parameters!
I already know I want this to run on this custom subdomain: ip.rhuaridh.co.uk
I also know my hosted zone name is rhuaridh.co.uk, so I can run this cheeky one liner to pull out the hosted zone name:
HOSTED_ZONE_NAME=rhuaridh.co.uk
aws route53 list-hosted-zones \
  | jq ".HostedZones[] | select(.Name==\"${HOSTED_ZONE_NAME}.\")" \
  | jq '.Id' \
  | awk -F'/' '{print substr($3, 1, length($3)-1)}'
You’re looking for something in the format Z00011111AAAA1AAAA11A.
If this didn’t work, or you don’t know your hosted zone name, then just run this command to pull it out manually:
aws route53 list-hosted-zones
Run a sam deploy
Now that I know the values I need:
- Custom domain:
ip.rhuaridh.co.uk - Hosted zone ID:
Z00011111AAAA1AAAA11A
I can now run a guided deploy:
sam build
sam deploy --guided
This will guide you through the set up instructions again, but will now ask for the two custom Parameters we configured in the template earlier:

These parameters will be saved to the samconfig.toml file:
parameter_overrides = "FQDN=\"ip.rhuaridh.co.uk\" ZoneId=\"Z00011111AAAA1AAAA11A\""
If for any reason it does not work, you can always add this line manually to the samconfig.toml file.
You should now see a list of new resources getting created. It can take a while to run as it waits for the certificate to be generated and validated.
Your output should now include your new domain name:

Summary
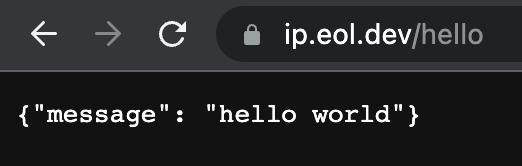
And that’s it! You can now visit your /hello URL to confirm it works.
Hopefully this gives you a good spring board for setting up a custom domain on your own serverless project using SAM.