
Note: This blog post is only suitable for local development testing, and is not intended for production use.
Introduction
We will be exploring the steps involved in manually configuring a custom Private Certificate Authority in Istio for use with mTLS.
This will help give us the knowledge needed to debug a custom CA setup in Istio.
Prerequisites
- You have a development Kubernetes Cluster to experiment on
- Istio is installed
- Istioctl is installed
- You can run
Makefiles - You have
jqinstalled
Create our custom certificates
Istio comes with a useful Makefile for this called Makefile.selfsigned.mk:
In the real world you would use an external CA, like AWS Private CA. These steps are only for testing on development kuberneters cluster!
If you’re not sure where your istio-* folder was now, you can run this on unix to find the location of Makefile.selfsigned.mk:
find / -name Makefile.selfsigned.mk 2>/dev/null
Create the root certifcate
So let’s override some of the defaults, then run the Makefile:
export ROOTCA_ORG=Rhuaridh
export ROOTCA_CN="Custom Root CA"
make -f /home/rhuaridh/istio-1.24.2/tools/certs/Makefile.selfsigned.mk root-ca
This command will create 4 files:
- root-cert.pem: the generated root certificate
- root-key.pem: the generated root key
- root-ca.conf: the configuration for openssl to generate the root certificate
- root-cert.csr: the generated CSR for the root certificate
The key for the root cert should always be stored outside the cluster. The only file we will take into the cluster is the root-cert.pem.
Create the intermediate certifcate
Similar to before:
export INTERMEDIATE_ORG=Rhuaridh
export INTERMEDIATE_CN="Custom Intermediate CA"
make -f /home/rhuaridh/istio-1.24.2/tools/certs/Makefile.selfsigned.mk cluster1-cacerts
This will create the directory cluster1:
- ca-cert.pem: the generated intermediate certificates
- ca-key.pem: the generated intermediate key
- cert-chain.pem: the generated certificate chain which is used by istiod
- root-cert.pem: the root certificate
These are the 4 files that we will use to create our Secret that Istio will use.
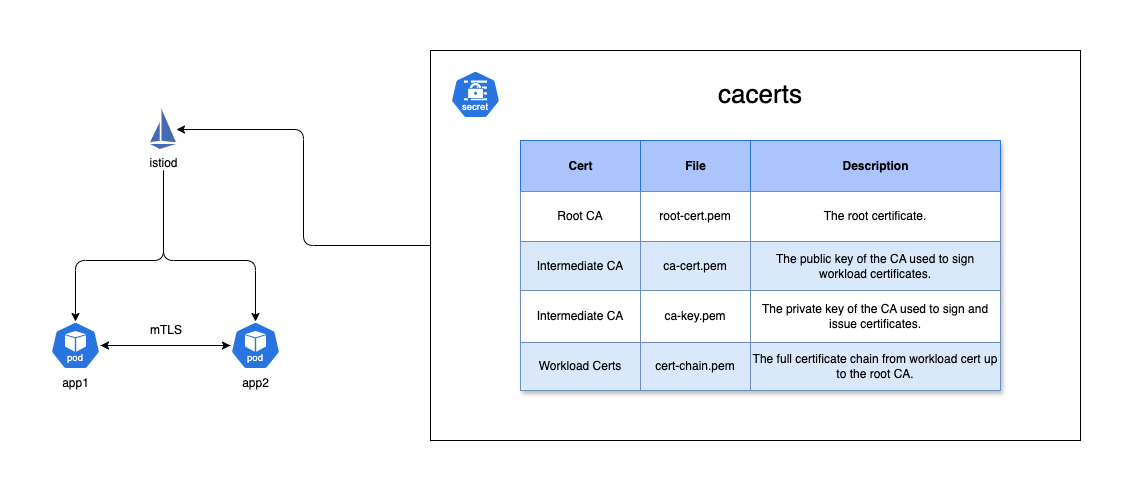
Create the cacerts secret
When using a custom CA, istio looks for the intermediate certificate you created in the cacerts secret in the istio-system namespace.
kubectl create secret generic cacerts -n istio-system \
      --from-file=cluster1/ca-cert.pem \
      --from-file=cluster1/ca-key.pem \
      --from-file=cluster1/root-cert.pem \
      --from-file=cluster1/cert-chain.pem
Confirm the Secret was created successfully:
kubectl get secret cacerts -n istio-system -o json \
  | jq '.data["root-cert.pem"]' -r \
  | base64 -d \
  | openssl x509 -noout -subject -issuer
We would expect to see:
subject=O = Rhuaridh, CN = Custom Root CA
issuer=O = Rhuaridh, CN = Custom Root CA
Restart istiod
Now we have the cacerts secret, lets restart istiod so it uses our custom CA.
kubectl rollout restart deployment istiod -n istio-system
Check istiod started with the custom cert
Run this command to quickly confirm istiod has picked up on our custom certs:
kubectl logs -n istio-system deployment/istiod | grep cert
Install sample services
Let’s leverage the sample applications provided by Istio for testing:
kubectl create ns foo
kubectl apply -f <(istioctl kube-inject -f /home/rhuaridh/istio-1.24.2/samples/httpbin/httpbin.yaml) -n foo
kubectl apply -f <(istioctl kube-inject -f /home/rhuaridh/istio-1.24.2/samples/curl/curl.yaml) -n foo
Note: If these already exist then you will need to redeploy them to pick up the latest certs.
Enforce mTLS
Then force these sample applications to use mTLS:
kubectl apply -n foo -f - <<EOF
apiVersion: security.istio.io/v1
kind: PeerAuthentication
metadata:
  name: "default"
spec:
  mtls:
    mode: STRICT
EOF
Compare certifcate chain manually
Now pull out the cert used by the proxy:
sleep 20; kubectl exec "$(kubectl get pod -l app=curl -n foo -o jsonpath={.items..metadata.name})" -c istio-proxy -n foo -- openssl s_client -showcerts -connect httpbin.foo:8000 > httpbin-proxy-cert.txt
Note: The verify error:num=19:self signed certificate in certificate chain error returned by the openssl command is expected.
If it works, you should see output containing details about the cert:
depth=2 O = Rhuaridh, CN = Custom Root CA
depth=1 O = Rhuaridh, CN = Custom Intermediate CA, L = cluster1
Parse the certificate chain:
sed -n '/-----BEGIN CERTIFICATE-----/{:start /-----END CERTIFICATE-----/!{N;b start};/.*/p}' httpbin-proxy-cert.txt > certs.pem
Let’s peak inside to confirm it has our intermediate cert:
openssl x509 -in certs.pem -noout -issuer
We would expect to see this here:
issuer=O = Rhuaridh, CN = Custom Intermediate CA, L = cluster1
Diff the certs
Now we have pulled down a copy of the cert that the proxy is using. Let’s split out the four parts, and then do a diff against our local certs to confirm they match.
Now let’s use awk to pull out the 4 proxy-cert parts:
awk 'BEGIN {counter=0;} /BEGIN CERT/{counter++} { print > "proxy-cert-" counter ".pem"}' < certs.pem
This awk command should create 4 files:
- proxy-cert-1.pem
- proxy-cert-2.pem
- proxy-cert-3.pem
- proxy-cert-4.pem
Verify Root Cert
After running the last step, we can compare the root cert by doing:
openssl x509 -in ./cluster1/root-cert.pem -text -noout > /tmp/root-cert.crt.txt
openssl x509 -in ./proxy-cert-3.pem -text -noout > /tmp/pod-root-cert.crt.txt
diff -s /tmp/root-cert.crt.txt /tmp/pod-root-cert.crt.txt
If it works, then we should see:
Files /tmp/root-cert.crt.txt and /tmp/pod-root-cert.crt.txt are identical
Verify CA Cert
Similar to above:
openssl x509 -in ./cluster1/ca-cert.pem -text -noout > /tmp/ca-cert.crt.txt
openssl x509 -in ./proxy-cert-2.pem -text -noout > /tmp/pod-cert-chain-ca.crt.txt
diff -s /tmp/ca-cert.crt.txt /tmp/pod-cert-chain-ca.crt.txt
You should see this output:
Files /tmp/root-cert.crt.txt and /tmp/pod-root-cert.crt.txt are identical
Verify the certificate chain
Verify the certificate chain from the root certificate to the workload certificate:
openssl verify -CAfile <(cat ./cluster1/ca-cert.pem ./cluster1/root-cert.pem) ./proxy-cert-1.pem
Tidy Up
kubectl delete ns foo
kubectl delete secret cacerts -n istio-system
kubectl delete peerauthentication -n foo default
kubectl delete -f /home/rhuaridh/istio-1.24.2/samples/curl/curl.yaml -n foo
kubectl delete -f /home/rhuaridh/istio-1.24.2/samples/httpbin/httpbin.yaml -n foo
Conclusion
And that’s it! Hopefully that gives you some ideas on how to debug a custom CA configured in Istio.
If you were looking into configuring this for production, then I would recommend researching external CA services like AWS Private CA, and also leveraging tooling such as cert-manager.
There are lots of different options, and the best ones will vary depending on the Cloud Provider that you are using to host your cluster.
For further information on configuring a custom CA in Istio then you can read their documention here.