
Introduction
This is a quick introduction to Dive, and a reminder to leverage multi-stage builds in your Dockerfile.
A common pattern in your Dockerfile is to:
- Leverage base image
- Install build tools
- Build application
- Serve application
However, a common mistake people make is that they leave their build tools in the image. This can result in larger image sizes, slower boot times and unnecessary dependencies.
Dive is a tool for exploring a docker image, layer contents, and can help you discover ways to shrink the size of your image.
Prerequisites
This blog post assumes:
Running Dive Locally
Before we get started, let’s create an alias to make using dive easier:
alias dive="docker run -ti --rm -v /var/run/docker.sock:/var/run/docker.sock wagoodman/dive"
For full install instructions please visit https://github.com/wagoodman/dive
Bad DockerFile
Let’s look at a bad example, and leverage dd to create an 100Mb mock-build-tools.zip file to make this easier to follow.
Create DockefileBad:
FROM ubuntu:24.04
WORKDIR /app

# Pretend to install build tools
RUN dd if=/dev/zero of=mock-build-tools.zip  bs=100M  count=1

# Pretent to use build tools to create our script
RUN echo "print(\"Hello World\")" > main.py

# Remove our mocked build tools
RUN rm mock-build-tools.zip

CMD echo "Hello World"
Then run the following commands to debug it using dive:
docker build . -t debug-using-dive:bad -f DockefileBad
dive debug-using-dive:bad
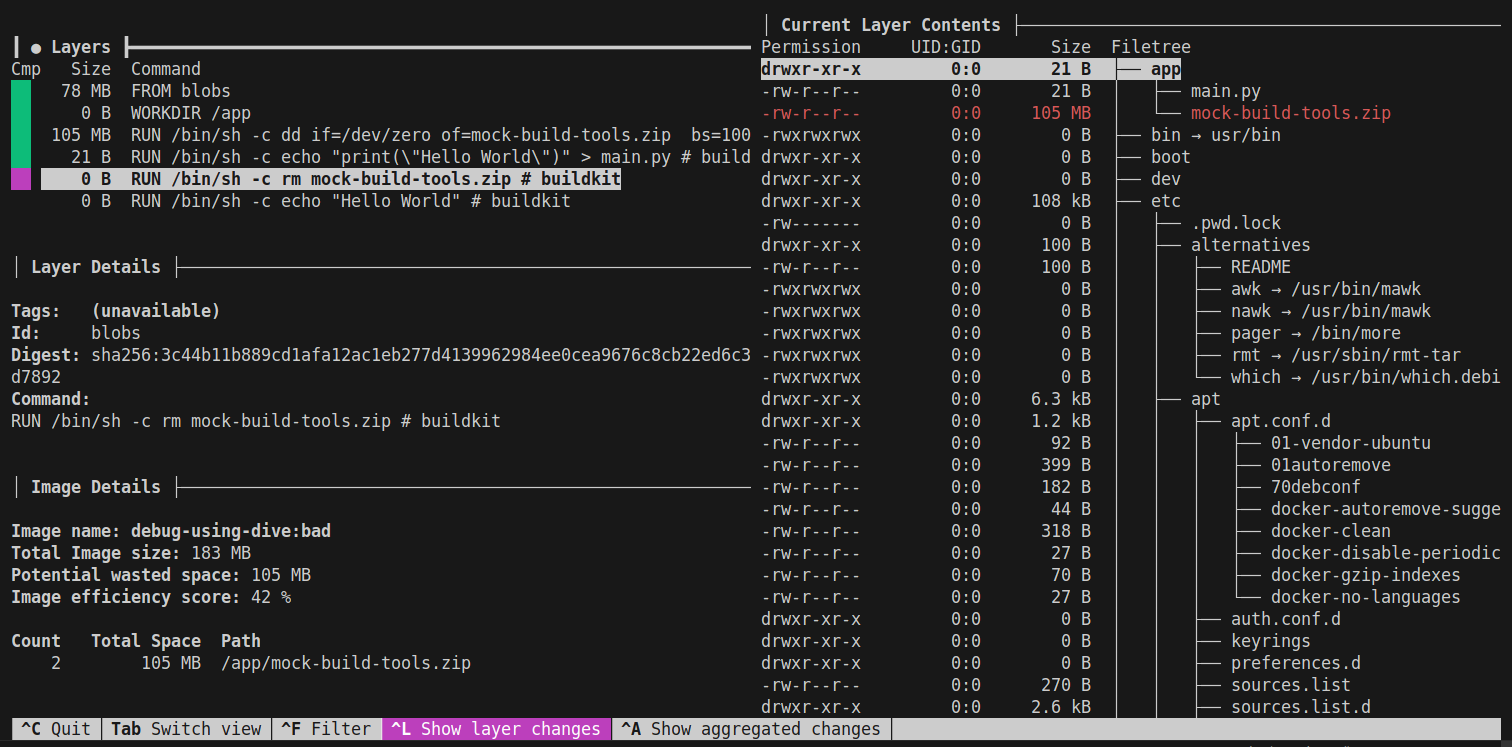
As you can see, even although we have a build step that removes mock-build-tools.zip, it is still baked into a previous layer in the final image.
This results in an “Image efficiency score” of only 42%.
Good Multi-Stage DockerFile
The better solution is to use a multi-stage build. This lets us clean up our build tools and avoid them forming part of the final image.
Create DockefileGood:
FROM ubuntu:24.04
WORKDIR /app

# Pretend to install build tools
RUN dd if=/dev/zero of=mock-build-tools.zip  bs=100M  count=1

# Pretent to use build tools to create our script
RUN echo "print(\"Hello World\")" > main.py

# Remove our mocked build tools
RUN rm mock-build-tools.zip

# Create a new image and only copy over the files we want to keep
FROM ubuntu:24.04
COPY --from=0 /app /app

CMD echo "Hello World"
The COPY --from=0 /app /app is where the magic happens, it lets us specify which parts of the first stage we want to keep.
Now run the following commands to debug it using dive:
docker build . -t debug-using-dive:good -f DockefileGood
dive debug-using-dive:good
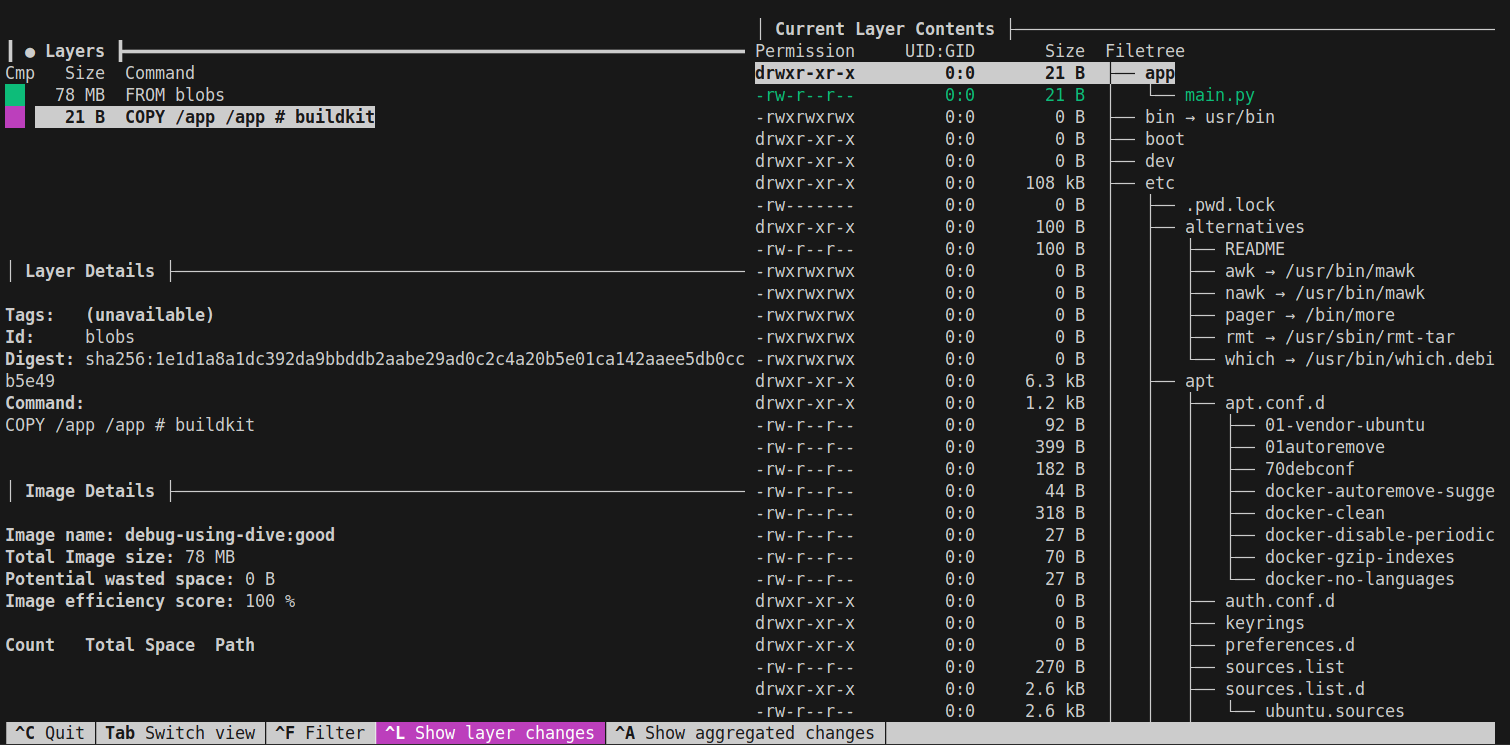
As you can see, our mocked mock-build-tools.zip file is gone but we have kept our application build under /app.
This results in an “Image efficiency score” of 100%.
Cleanup
To clean-up the two images we just created, you can run:
docker image rm debug-using-dive:bad
docker image rm debug-using-dive:good
Summary
Dive is an excellent tool for debugging your Docker containers. More importantly, it is an excellent tool for investigating unfamiliar third-party images.
Multi-stage builds can help us create smaller image sizes and help achieve faster cold starts. This also helps improves your security posture by reducing the attack surface of the image.
Dive can help us debug different layers of an image, and to see what files have changed at each layer.
Next up, we will look at linting our Dockerfile.